Sunday, October 6, 2013

Fall Is In The Air

Today the weather cooled off and reminded me that autumn is definitely here.  To mark the season change I've come up with a series of new pieces in my etsy shops.  Most have some kind of browns and feature some of my new designs which I'm really excited about.  Here are some pictures:


I'd love to see what autumn has inspired for you...

Happy Creating!
--Kathy


Friday, October 4, 2013

Hand Carved Animal Tiles

Several years ago I carved a series of tiles that featured animals.  I recently found the mold of them, so I decided to make a few to list on etsy.  Here are two examples that I glazed with a really cool matte glaze (when it pools it gets glossy).  Check them out.

I have a friend who loves roosters.  I decided to carve this so I could make a magnet set for her birthday.   Adding the loops to this tile allows it to be a pendant.  It is glazed on all sides. 

My daughter loves elephants, so of course I had to do one of these.  I like how these creatures extend slightly into the frames.  I also like how the glaze accentuates the piece without overwhelming it. 

How do you come up with the textures and patterns in your jewelry?

Happy Creating!
--Kathy

Tuesday, September 24, 2013

Organic Pattern Ceramic Jewelry Connectors

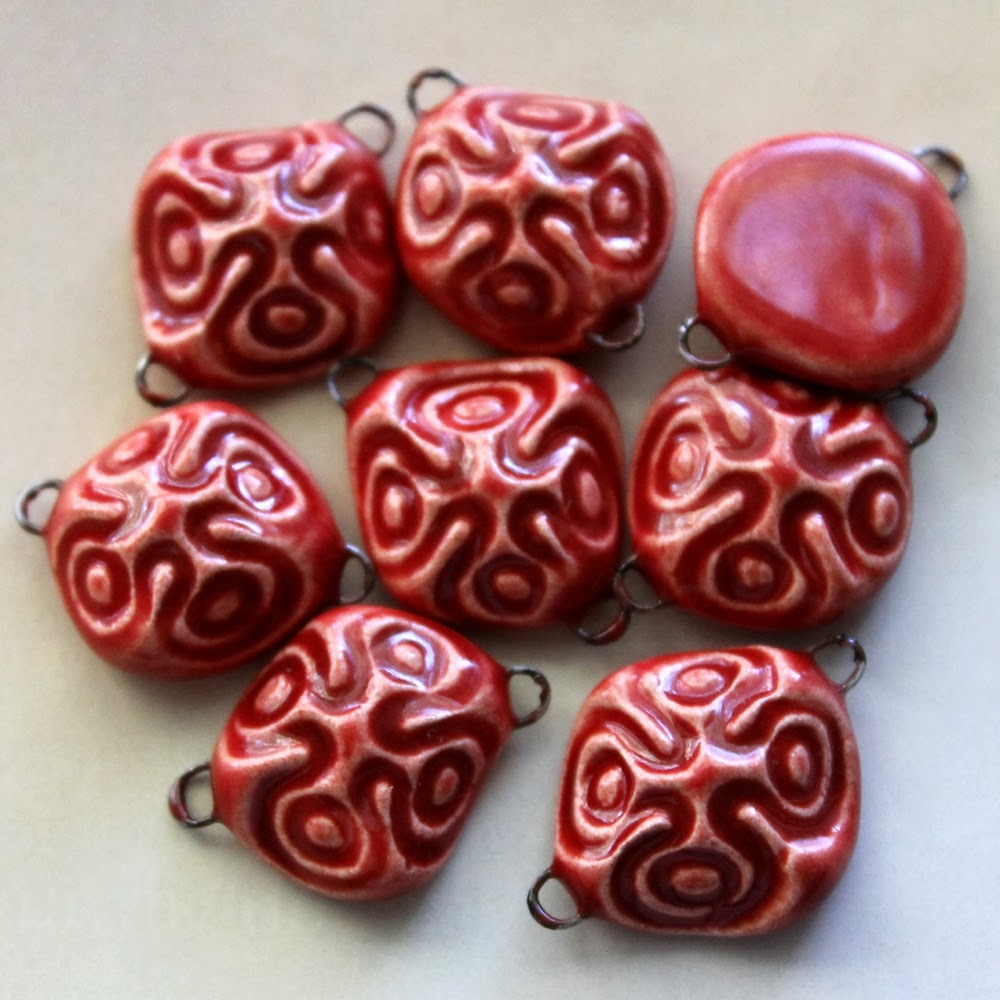
I was doodling one day and really liked one of my designs.  It was simple, organic, and I decided it could make a cool design for a new set of jewelry connectors.  So, I set to work making a stamp which I then pressed into balls of clay.  I wanted the pieces to be really textural but to lay flat, so I made them domed on top and flat on bottom.  I finished them off with wire loops.  Next, it was time to pick the glazes.  I've been really inspired by fall colors, so I decided to come up with a fall-inspired color palette.  I picked five colors (or color combos).  I was amazed at how each glaze, with its own characteristics, completely transformed the same piece into something distinctive.  Here is the whole array...


First I tried out a new color--a slightly matte turquoise color.  I used this specialty glaze on the largest of the connectors.  These look soft and organic. 
Then I used one of my favorite glazes, a dark blue/brown glaze.  The blue doesn't look very blue in these, but they are still dark and pretty.   These look old and worn.


On to a reddish brown glaze.  I was hoping that the design indentations would turn yellow like they did in the polka dot recesses of a previous bead I made, but they ended up being an interesting almost olive color.  Hmmm.  That's the great thing about ceramics is that it is not always predictable.  These look like confections.  Chocolate anyone???

I had recently picked out this salsa red glaze because it matched one of the fall color trend colors reasonably well.  It is a runny glaze, so it really enhanced the pattern.  These look busy so they would be great paired with solids. 


Finally, the smallest of the pieces got a two-tone treatment of some of my favorite glazes.  I used a yellow/brown glaze on one side and a sea blue/brown glaze on the other.  They blended beautifully.  I just put all of these connectors up on etsy and this two-tone variety got the first "favorites" status.   These look like a rainbow gone autumn.  While the design adds to the pieces, the color is the main attraction.  Pretty.


Well, I hope you've enjoyed seeing my latest jewels.  You can check out these and my other ceramic jewelry components at www.pajegoarthouse.etsy.com.  I'd love to see what new things you are up to.  Has fall inspired you like it has inspired me?  

Happy Creating!
--Kathy

Tuesday, September 3, 2013

Unbroken Pattern Birdie Clasps

As many of you know I'm most well known on etsy for making my birdie clasps.  I've historically made most of my clasps with headpins going through the bird to create the loop in back of the bird, but I've found that sometimes this doesn't show off the beautiful patterns best.  So, I've been trying out a new method where I've embedded wire loops into the back of the birds. 

Pros: Secure loops, I can easily glaze all sides of the bird, design is uninterrupted, bird has less wiggle room in the toggle
Cons: I lose the beautiful enhancement of beads/metal

Over all, I really like how the pieces are coming out.  I plan on making them both ways.  I'd love your opinions...

Here are some pictures.


Sunday, August 25, 2013

Copyright Free Design Source - Dover Publications

Dover Publications - Get Designs (Some for Free!)

I love using my own art work for my jewelry pieces, but after a while you need supplemental pictures.  The most amazing source I have found is the Dover Publication series of art books.  These books are full of beautiful designs that are all available for crafts people to use without permission (although there are some limitations such as no more than 4 designs in a piece and designs cannot be used in new design source compilations--check the books for specifics).  They have massive libraries of designs and clip art from around the world and through time.  Some are in color and some are black and white and many come with vector design CDs.  These are fantastic for all crafters from scrapbookers to ironworkers to wood carvers to jewelry artists.  These books can be purchased at DoverPublications.com, however they do offer a free perk!  You can sign up for "The Dover Design Sampler" emails that come weekly.  This means every week you have access to a few FREE pictures.  You can save these to your computer too for later use.  I love this and have collected some great designs from this source.  Check it out.
PS. I've also found copies of these books at the library so see if your library has some before buying.  
Happy Creating!
--Kathy

Friday, August 23, 2013

Tent Rock, New Mexico - Destination Inspiration

We recently went hiking at Tent Rock in New Mexico.  This is such a neat location.  Although on a much smaller scale, this National Monument features slot canyons reminiscent of Bryce canyon--but with white rock.  I thought that the rock formations were so interesting and inspiring.  Here are some pictures.


Okay, so how can this inspire our jewelry design?  I found the earthy colors and simple geometric designs really inspiring.  I also love the Native American influence of the area.  Based on these ideas I tried out a whole new series of glazes that remind me of rock.  Check out these connectors.


I think they really reflect the inspiration location.  I love how the glaze is unpredictable and matte.  These would give a really earthy look to a jewelry piece.  I would love your thoughts and pictures of what you've been making. 

Happy Creating!
--Kathy

Wednesday, July 3, 2013

Laserjet Printer Decals - Art Bead Ceramic Connectors

Hot out of the kiln, here are some handmade art bead connectors using laserjet printed decals...


I love using decals printed from my laser jet printer.  You can do this using a special kind of water slide decal paper (check to make sure that your printer is compatible).  I purchased mine through www.nmclay.com.  They are awesome--they can even print some out for you if you don't have the right printer.  I then printed out a beautiful design on the special paper, cut it out and applied the decal to my glazed ceramic piece.  I then fired it.  Firing temperature will vary depending on the type of glaze you used.  (In this firing these turned out lovely but I had a set of white ones that turned out washed out and crackle glaze ones where the decals almost disappeared--I'm guessing because the glaze ran too much during firing).  I do know, however, that all glazes are supposedly compatible with these.  You'll just have to experiment with firing temps.  The iron in the ink turns to a sienna finish on glaze after firing.  You can use these decals for photographs or just cool designs.  I just fired these connectors last night and I love how they turned out.  I'm also happy with how the design looks on them.  These would make really cool earrings or connectors for bracelets or necklaces.  Hopefully they make you want to try out this fantastic medium.  I'd love to see how you've used this type of decal.
Happy Creating!
--Kathy

Sunday, June 23, 2013

2-Tone Circle Clasps

Lately I've been experimenting with blending glazes.  I've tried out several combinations but I'm particularly enamored with the combination of these rustic colors.  You can check out a bracelet I made with one on day 7 of my Week of Bracelets series.  I'm planning to try out new colors or shapes, and possibly designs applied on top.  Here are some of my pieces.  I hope you like them.

Yellow on outside, bluish on inside, greenish toggle bar

Terracotta on the outside, bluish on inside, bluish toggle bar
Bluish on outside, terracotta in the middle, bluish toggle bar

Friday, June 21, 2013

Necklaceology Book Review


For Christmas I got a Barnes and Noble gift card, so I bought 2 jewelry design books with it.  The first was Bohemian Inspired Jewelry by Lorelei Eurto and Erin Siegel (see my review of it in my May 2013 archive) but to reach the $25 free shipping, I picked out another book that I knew relatively little about.  It is Necklaceology: How to make chokers, lariats, ropes & more by Candie Cooper.  It looked intriguing and the cover boasted 40 different jewelry designs, so I was excited to get it.  I wasn't disappointed.  Some of the designs were pretty traditional, but I found some of them to be unique. 
https://blogger.googleusercontent.com/img/b/R29vZ2xl/AVvXsEi8DeFveH9LrkMaAl5uLLJ1gijK2DAz2Sc7LTHC9X8q5ZlVOh2hd9DRqJYPuD-C-hoiTvX_aPx9__Uksy76GJceH_0eWQQ3DERj0khCDt8O_cKgapVXBWOQQeLL_HMgmeGfSzpKYSWU-S1s/s640/Necklaceology1.jpg 
While I enjoyed looking at the designs summed up in words like "axis," "helios," and "stone's throw," what I liked most about the book is that it gave techniques for altering individual jewelry components.  So many times we see jewelry that is mass produced with recognizable components.  Candie shows us how to take these components and add color, patinas, texture, and composition.  These little changes can make a huge difference in making your pieces one-of-a-kind and special. 

Many of her jewelry projects in her book show the sketched piece and the finished piece.  I enjoyed seeing the translation from the sketch to the actual piece.  The sketch also helps reveal the structure of the pieces, so you can use it as a jumping off point for your own jewelry designs--change up the beads, add little embellishments, use a different cord, etc. 

The book is published by Lark Crafts (Lark also publishes the fantastic 500 book series), and was worth the money.  I have already looked through the book many times and I will be using it as a reference in the future.  Yay for great jewelry artists who share their inspiration.

Happy Creating!
--Kathy

Friday, June 14, 2013

Taos, New Mexico - Destination Inspiration

We recently took a trip to Taos, New Mexico, and stayed in a lovely little bed and breakfast (Hacienda Del Sol).  The feeling in Taos is quite unique.  It is a town of Native American and Spanish influence and has been settled for hundreds of years.  Currently Taos is also known as a mecca for artisans.  Color is big here and our B&B shows that.  Most of the decorative pieces were handmade by artisans and some are very old.  Here are some pictures of the building where we stayed. 
 
Gorgeous waiting room/hallway--every piece has a history.  The floor was original to the structure and had dips and slopes.
Yes that is my cute baby, but try to focus on the room--definitely a southwestern vibe but the room also touches on the catholic history of the location. The door was quite small--I (5'3") fit fine but my hubby (6'2") had to duck.

The whole B&B was covered in original art much of which was for sale.
 
There is nothing like a crackling fire and check out the lovely timbers on the ceiling.


So, how do we reflect a little bit of Taos in our jewelry pieces?  Perhaps fun colors, different textures--maybe weathered wood or stamped silver.  Maybe crosses, pieces reminiscent of landscapes, or Georgia O'Keefe inspired elements.

Based on my experience, (and my supplies) I decided to emphasize the Spanish flavor of fun colors in a necklace.  You can see the bright colors mixed with silver and a touch of turquoise stone.  The pendant looks a bit worn and has a design that could be old.  Here is my Taos inspired necklace...


I would love to see your pieces.

Happy Creating!
--Kathy

Saturday, June 8, 2013

A Week of Art Bead Bracelets - Day 7

Day 7 (Final Day)

To finish off my week of bracelets, I decided to use one of my clasps as the focal art bead.  This is a new color combo clasp I've been working on and I love how the two colors come together.  I paired the ceramic circle with stamped brass for the toggle bar.  For this final bracelet I decided to do a cha cha style with lots of moveable parts.  I've added a chain with lots of wonderful medium sized glass beads.  They have so much play that this bracelet could jazz up any outfit.  I hope you like bracelet #7. 


I hope this week of bracelet designs has sparked some new ideas in you.  I'd love to see what you are working on.  Happy Creating!
--Kathy

Friday, June 7, 2013

A Week of Art Bead Bracelets - Day 6


Day 6

Today I'm getting in touch with my southwestern surroundings.  Here is art bead bracelet #6:


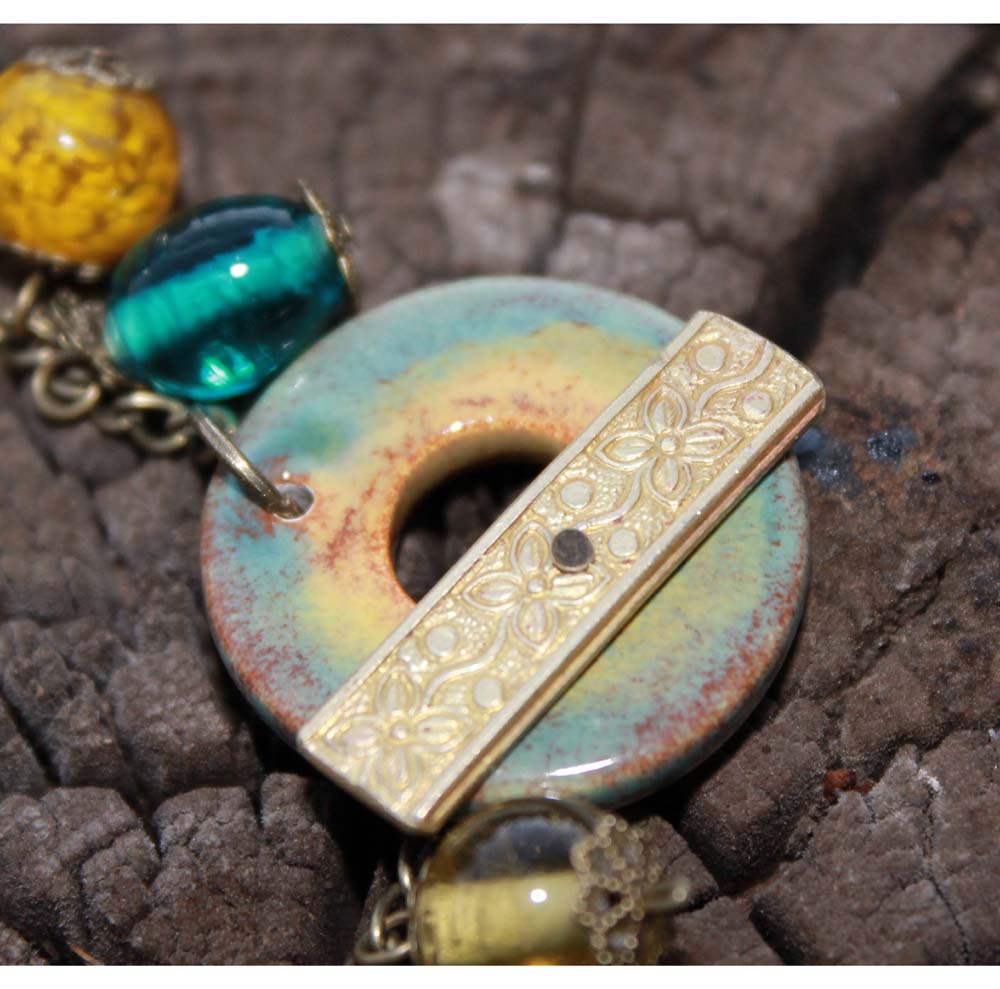
This bracelet features some glazed round beads with melted glass.  The glass makes a beautiful color contrast to the brownish glaze and also adds some crackling, which I think gives it more interest.  The four handmade beads are separated by spacers, attached to silver washer rings on either side and connected to brown leather suede.  I know that leather is hot right now, so I wanted to do a bracelet that included some.  Finally, I finished off the piece with a silver toned barrel clasp.  I like that it is about the same diameter as the leather and it ties in the silver end caps on the leather as well.  I hope you like bracelet number 6.
What do you think of this bracelet, and what are you working on?  I'd love to know or see pictures. Happy Creating!

--Kathy

Thursday, June 6, 2013

A Week of Art Bead Bracelets - Day 5

A Week of Art Bead Bracelets - Day 5

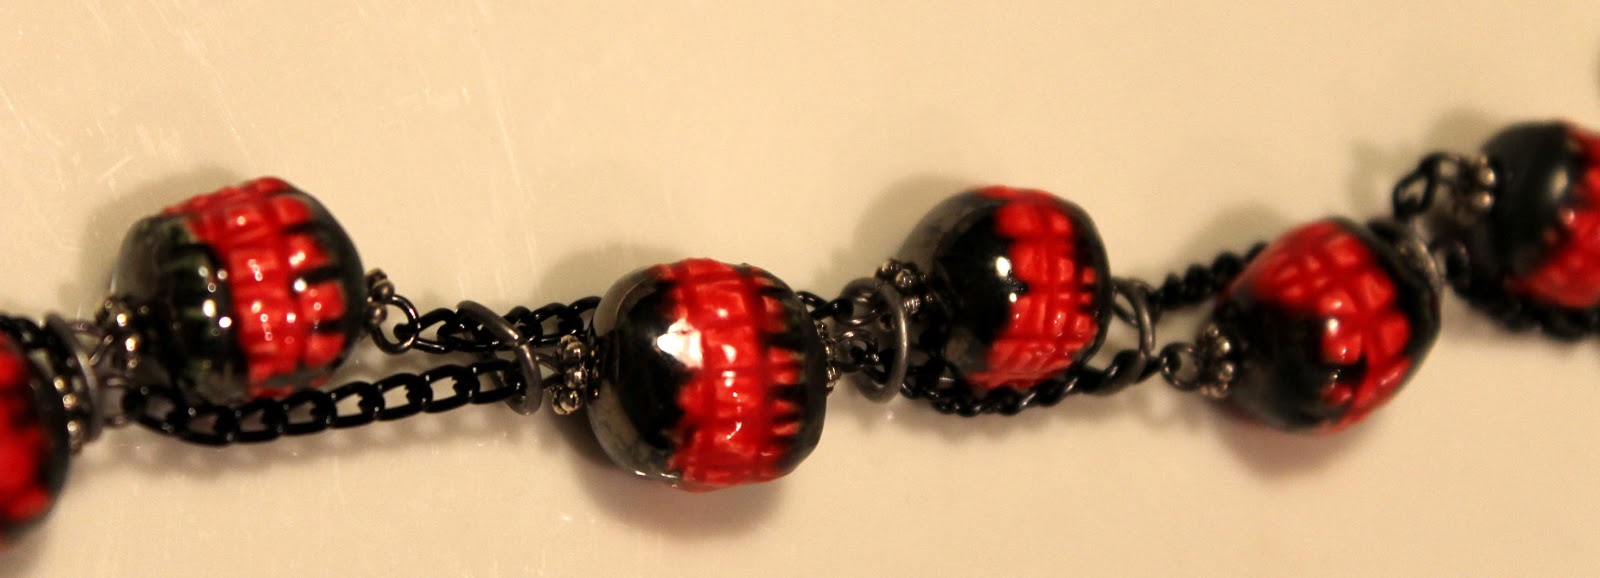
Okay, I'm going a little goth on you today.  A while ago I made these fantastic red and gray/silver beads.  I stamped them so they would look interesting and I glazed them with three glazes.  The bright red is in the middle, a semi gloss gray is on one side and a mirror-like silver gray is on the other side of each bead.  Because of the stamped design, the glazes ran together showing off the geometric shapes.  I really love how they turned out.  These beads are a little more free form than some of my others, so they vary a bit in size and shape.  A talented jewelry designer friend of mine suggested that I use black chain with them and I loved the idea.  I just didn't know how it would all come together.  I decided to add a hint of antique silver and this beaded bracelet is what I came up with.  It has a wonderfully Gothic feel.  The bracelet construction is composed of two strands of beads.  I then bound them together with jump rings that are free to move a little.  This binding gives the bracelet a feeling of bulk without the movement of two loose strands.  I used 1 to 2 connectors at either end and connected them to a clasp that snaps shut.  I think this kind of clasp is a little easier to use when putting a bracelet on yourself.  I hope you like bracelet #5. 


This picture really shows the detail in the beads as well as the structure of the bracelet.
What piece are you working on today?  Any innovative ideas or beads?  I'd love to see pics or hear your input on my designs.  Happy Creating!
--Kathy

Wednesday, June 5, 2013

A Week of Art Bead Bracelets - Day 4

A Week of Art Bead Bracelets - Day 4


This bracelet is much more earthy than some of the others.  It is grounded with chocolate brown and yellow.  The chocolate brown is a really cool glaze.  It has flashes of yellow in it, but the coolest part about it is that there are tiny sparkles in it.  I have only found one other glaze that does sparkles, and that glaze doesn't look this cool.  Thee diamond shaped art bead is mold-formed and the tan swirly one is stamped on both sides.  I like that the chain is doubled up a bit, and I love the dangles at the bottom of the extender.  This would be a fantastic bracelet for fall.  What does your most recent bracelet look like?  What is your inspiration? Happy Creating!
--Kathy

Tuesday, June 4, 2013

A Week of Art Bead Bracelets - Day 3

A Week of Art Bead Bracelets - Day 3


Going in for a whole new look, this bracelet has more of a "running on the beach" feel.  The art bead on this is, of course, ceramic and has dragonflies stamped into it.  I've used a glaze on the focal piece that is really cool.  It is mostly tan, but has hints of periwinkle.  I've paired up the dragonfly focal with one side of turquoise stones and one side of smaller handmade ceramic beads.  Some of these are two toned, and some are stamped.  The smaller beads with the straight lines on them are glazed with the tan/periwinkle glaze in the center, and a blue glaze on the edges.  The back of these beads is cross-hatched too, so when the beads turn around it'll give different looks.  I've put these beads on copper because I thought the copper would pop more than bronze.  Looking at it makes me miss the beach...
Happy Creating!
--Kathy

Monday, June 3, 2013

A Week of Art Bead Bracelets - Day 2

A Week of Art Bead Bracelets - Day 2


This bracelet has a whole different feel than yesterday's.  This bracelet was made with colorful ceramic beads including three art beads.  I've linked them together with silver toned findings, charms, and added fun little crystal beads for a little more glitz and movement.  This bracelet screams warm weather to me and is fancy.  It would be perfect to wear on a date with my wonderful hubby.  
Happy Creating!
--Kathy


Sunday, June 2, 2013

A Week of Art Bead Bracelets - Day 1

I've been really interested in making art bead bracelets in the last few days, so I thought I'd devote a week to them--one new bracelet every day.  It will be a fun way to use some of my jewelry supplies and have some stuff to list on my finished jewelry etsy site, www.shookaloot.etsy.com.  I'm going to try different patterns, colors, and general designs.  I'd love to see what bracelets you come up with.  So here it goes,

DAY 1


 I really like how this bracelet turned out.  The colors are inspired by nature and I would call the overall design Bohemian.  The focal art bead has been kicking around my studio for a while.  It was made out of earthenware ceramic clay which was stamped and glazed with one of my favorite rust-colored glazes.  I made a matching bead to pull the eye along in the bracelet design.  I also adore these colors of green.  All three colors look great with antique bronze chain and findings, one of my favorite colors to work with.  I particularly like how the chain changes part way over from one larger layer of chain to two smaller layers.  I also love the way this moves on your wrist.  So much fun.  I'd love to see your "Day 1 Bracelets."  Send them in along with comments.  I'd love to hear what you think of this piece.  Happy Creating!
--Kathy